Custom wrapping paper turns the moment a customer opens a package into a branded experience, but only if the specification is right. Order paper that is too thin and it tears at the corners; choose the wrong printing method for your quantity and you either overpay for a short run or blow past your budget on plates you did not need. This walkthrough takes the decisions in the order you should actually make them, so that by the end you can hand a supplier a clear brief and get back exactly what you pictured.
There are five specifications that determine the outcome: the paper weight, the stock and finish, the format and size, the printing method, and the artwork setup. Work through them in that sequence, because each choice narrows the next. The numbers below are drawn from industry norms and are indicative rather than universal, so confirm anything critical against a physical sample and your supplier’s own capabilities.
Step one: choose the paper weight (GSM)
Paper weight is measured in grams per square meter, and it is the single biggest driver of how the finished wrap feels and performs. Three bands cover almost all gift wrap. Lightweight paper, roughly 40 to 60 GSM, is flexible and folds crisply around irregular shapes, which makes it the standard for decorative retail wraps where cost per sheet matters. Medium weight, about 70 to 90 GSM, is the sweet spot for branded gift wrapping because it balances durability with excellent printability and resists tearing at folds. Heavy stock, 100 to 120 GSM and above, is reserved for luxury packaging and cases where the paper needs real structural resistance, such as premium retail boxes or food-adjacent uses.
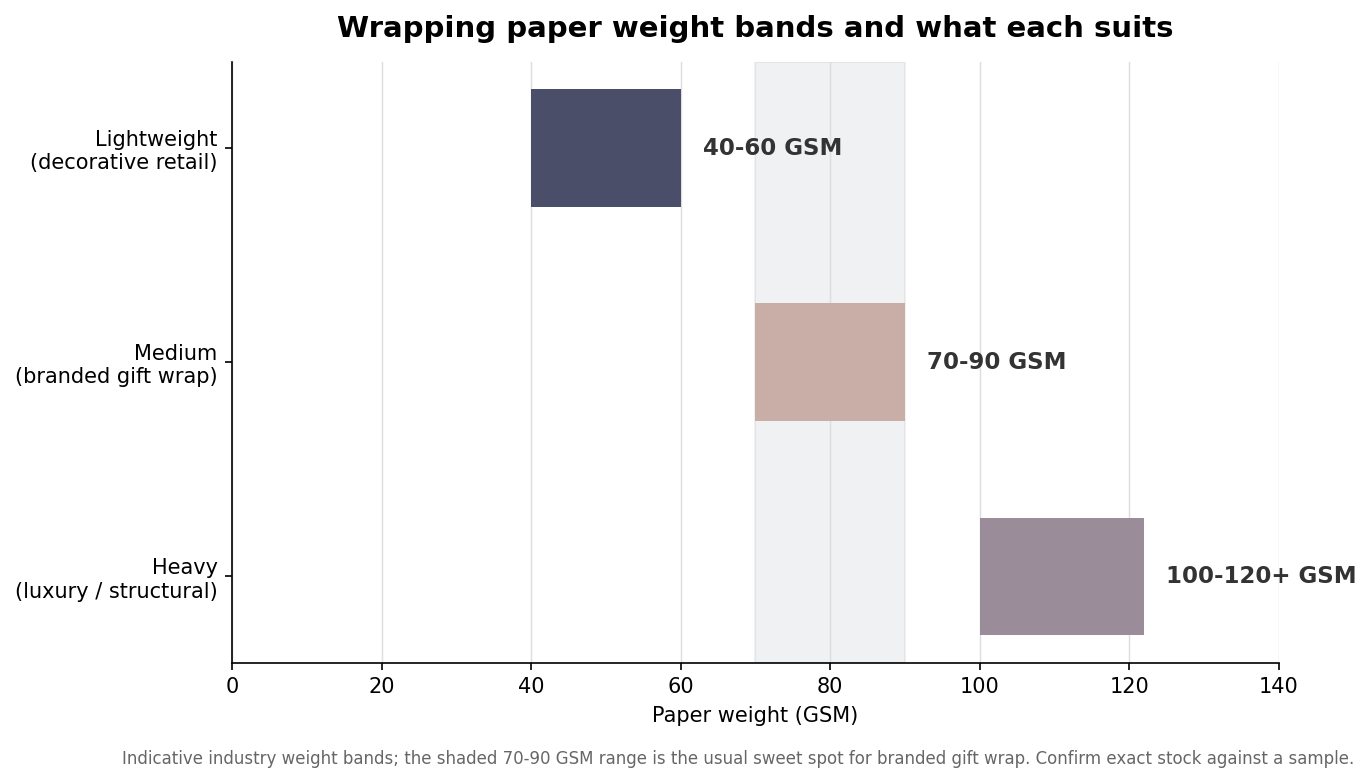
The practical guidance is to default to the 70 to 90 GSM band for most branded wrap. It photographs and reproduces well, survives the wrapping process without creasing badly, and does not feel cheap in the hand. Reserve the heavier stocks for genuinely premium lines, because the extra weight raises both material and shipping cost, and drop to lightweight only when the wrap is purely decorative and volume is very high.
Step two: pick the stock type and finish
Weight tells you how heavy the paper is; stock type tells you what it is made of and how ink will sit on it. Coated or art paper holds fine detail and vivid color because the surface is sealed, making it the choice for photographic designs and tight brand colors. Uncoated and kraft papers absorb more ink and read as natural, matte, and eco-minded, which suits rustic or sustainability-focused brands but softens fine detail. Tissue is a separate lightweight category used inside boxes and bags rather than as an outer wrap. Finish then layers on top: a matte finish is understated and hides fingerprints, while a gloss or metallic finish adds shine at additional cost. Choose the stock to match your artwork first, because a detailed full-color design on absorbent kraft will never look as sharp as it does on a coated sheet.
Step three: decide roll or sheet, and nail the size
Format is a fulfillment decision as much as an aesthetic one. Rolls suit ongoing wrapping stations and retail counters; common widths run from about 30 to 70 centimeters (roughly 12 to 28 inches), a frequent retail roll being 30 inches wide on a 3-inch core, with wholesale lengths reaching several hundred meters. Flat sheets suit gift services and subscription boxes where each item is wrapped once; retail sheets commonly measure around 50 by 70 centimeters, with luxury formats up to 70 by 100 centimeters. Size the format to the largest item you routinely wrap, and confirm the roll width covers that item’s longest dimension plus overlap, since a roll an inch too narrow forces awkward seams on every package.
Step four: match the printing method to your run size
This is where budgets are won or lost, because printing methods have very different cost structures. Digital printing uses no plates, so setup cost is minimal and it is the economical choice for short runs, full-color artwork, and designs you may revise; the tradeoff is a higher per-unit cost that stays roughly flat as quantity grows. Flexographic printing uses a plate for each color, so it carries an upfront setup cost but drives the per-unit price down sharply at volume, making it ideal for bold, repeating patterns produced in large quantities. Rotogravure, using engraved cylinders, only becomes economical at very high volumes but delivers exceptional consistency across long runs.
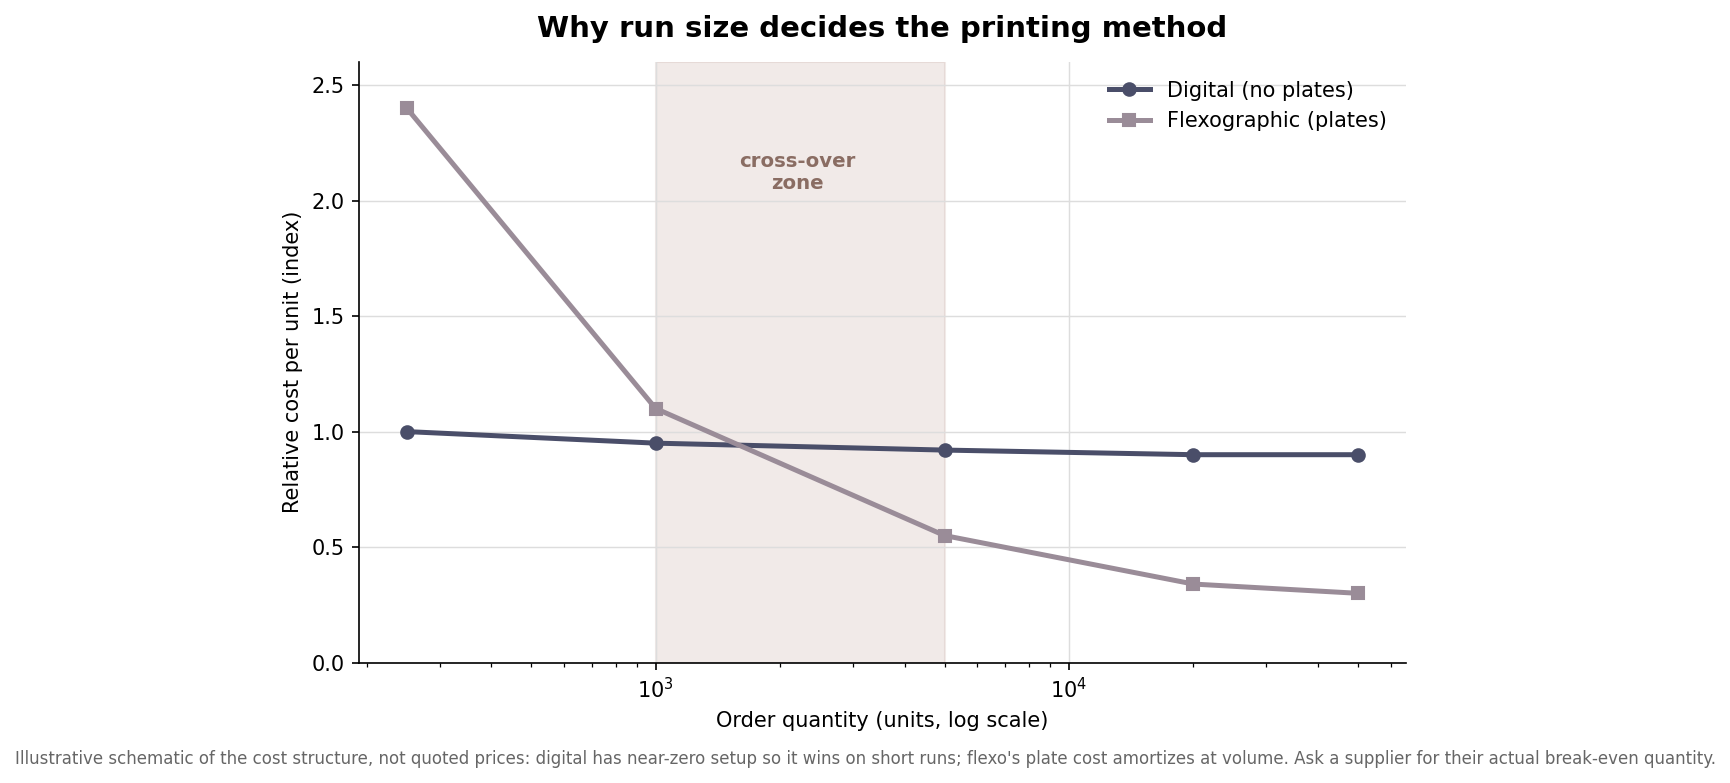
The decision rule is straightforward: for hundreds to low thousands of units, or anything with fine detail and frequent design changes, digital almost always wins on total cost. As your annual volume climbs into the tens of thousands and the design stabilizes, flexographic printing’s setup cost gets amortized away and it becomes cheaper per unit. Ask any supplier for the break-even quantity between their digital and plate-based options before committing, because that single number tells you which method your order belongs in.
Step five: prepare artwork and always proof first
The final specification is the file itself. Wrapping paper designs usually repeat, so build the artwork as a seamless tile that continues cleanly across sheet edges and roll cuts, and include bleed so no white gaps appear when the paper is trimmed. Specify brand colors as defined values, such as Pantone references, rather than trusting on-screen appearance, since color shifts between screen, coated stock, and uncoated stock. Above all, request a physical proof on the actual stock before the full run. A proof costs a little time and a small fee, but it is the only reliable way to catch a color that prints darker than expected or a repeat that does not line up. Get those five specifications right, in order, and custom wrapping paper becomes a dependable, repeatable extension of your brand rather than a gamble on every order.